Last Updated on December 6, 2023
Are you a coffee lover? Sure, buying coffee from a cafe or making instant coffee at home before work gets the job done, but there’s an amazing alternative. If you want an easy way to brew quality coffee in the comfort of your kitchen—or even over an open fire—learn how to use a moka pot.
How a Moka Pot Works
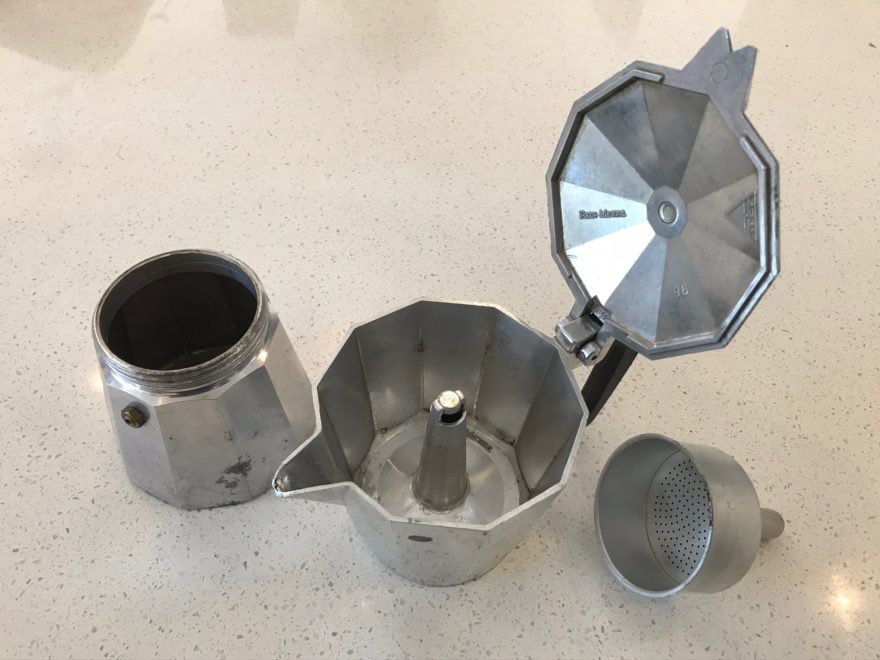
A moka pot has three chambers. The bottom chamber holds the water. The middle chamber holds your coffee grounds. The upper chamber holds the coffee, after pressure from the heated water has passed through the grounds and performed its extraction.
Right before the water begins to boil, the pressure forces the water through the grounds and boom, you have concentrated coffee.
Moka Pot Coffee Brewing in 8 Easy Steps
The moka pot’s unusual appearance scares some people away, but once you understand how to use a moka pot the process is actually quite simple. Follow these moka pot instructions closely if you’re new to this method of brewing.
1. Fill the bottom chamber with water
Fill the bottom chamber so that the water level comes to the bottom of the pressure-release valve, but doesn’t cover it. This is the maximum capacity of your moka pot.
The pressure-release valve is an important safety feature. If pressure builds up in the bottom chamber, the valve allows it to escape. It needs to be clear to do this.
If you are able to use a scale to weigh your water as you fill it, this is a great idea. It will help you calculate the correct amount of coffee to grind in the next step. If you don’t have a scale, just fill to the bottom of the valve.
2. Grind the coffee
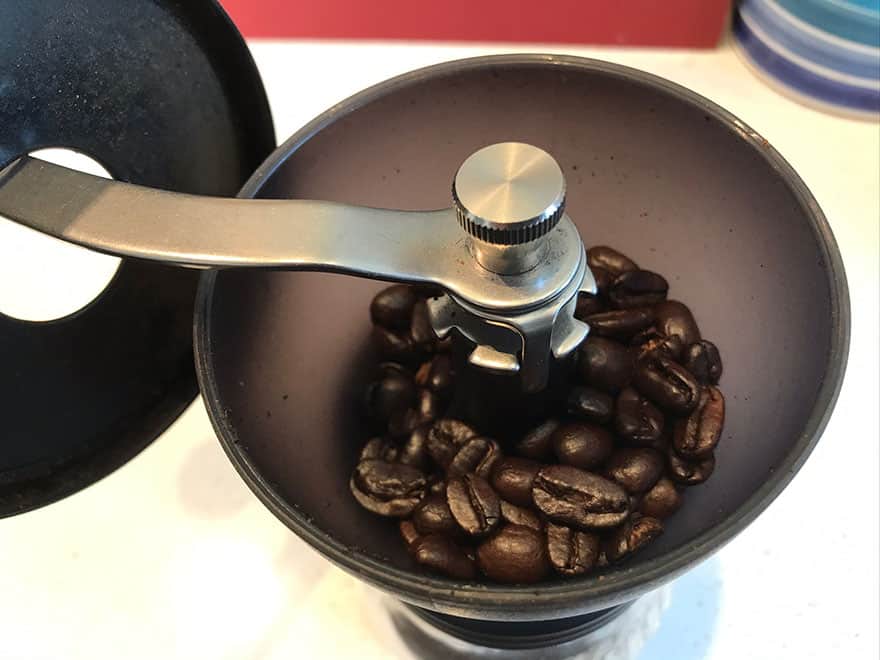
Grind your beans to a medium-fine grind. The ideal grind size should be somewhere between what you use for drip coffee and what you get from an espresso grinder. You can experiment with this. If you weighed your water in the previous step, divide that number by 16 to get the correct weight of coffee to grind.
3. Fill your basket
Add coffee grounds to the basket and shake to level them, but do not tamp them down.
I recommend using a coffee-to-water ratio of 1:16, which is standard for most brewing methods. If you don’t have a scale, filling your basket to about two-thirds of its capacity should be about right, assuming you’ve filled your water to the bottom of the pressure valve.
In other parts of the internet, you will find people insisting that moka pot baskets must be filled to the top with grounds every time, then levelled. In fact, Bialetti’s own instructions say this. However, I learned from a coffee lover in Little Italy that this is simply not true.
Given the capacity limitations of the water chamber, filling your grounds to the rim will result in a coffee-to-water ratio that is far higher than what is recommended even for strong coffee. Many people find this overpowering. Again, if you’re trying to achieve that almost-espresso style coffee, then by all means go for it. Otherwise, stick to a typical ratio.
4. Insert the basket
Nestle the coffee grounds basket into the opening of the water chamber. It should fit snugly, with its tube dangling in the water.
5. Screw on the top
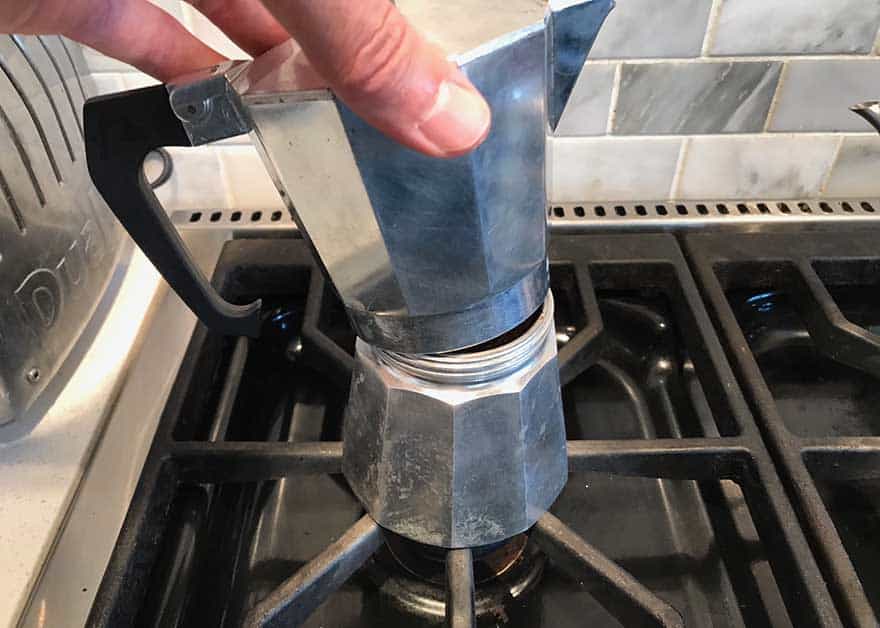
Place the top chamber onto the bottom chamber so that the threads line up, then screw them together. They should screw together smoothly. If you meet resistance, unscrew and realign the threads.
6. Heat the water
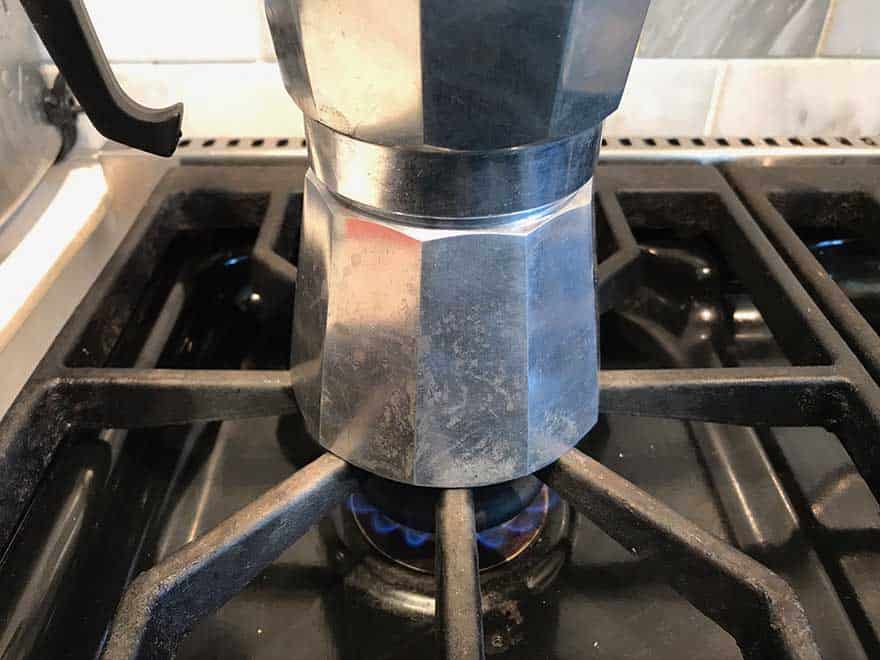
Heat the moka pot on a medium-low burner with the lid flipped open. Try to make sure the handle isn’t directly over the heat source, to keep it from melting and avoid burning yourself when you grab it.
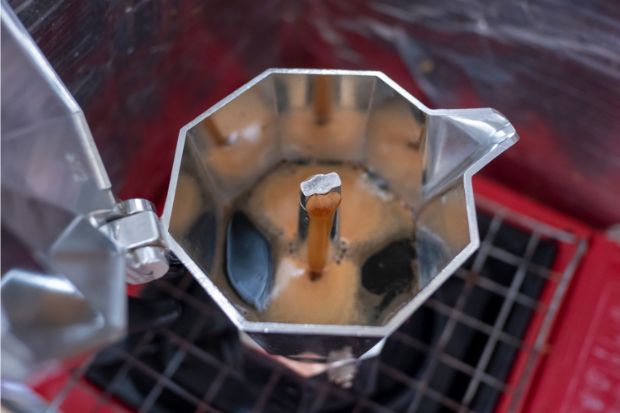
7. Watch the upper chamber
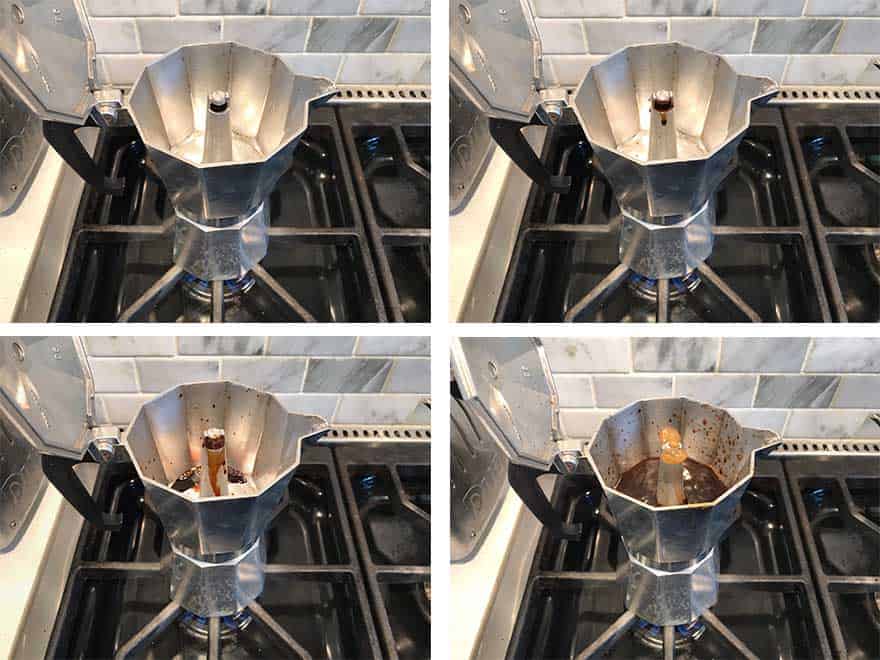
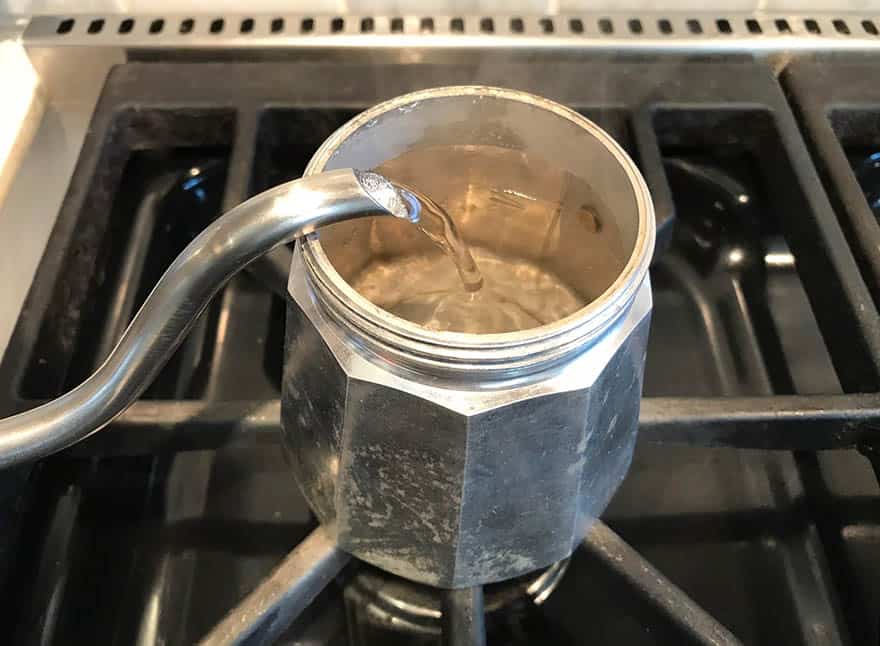
As the coffee brews, pay attention. Pressure created from the heated water will force steam up through the tube and through your coffee grounds. Coffee will begin to bubble out of the chimney and drip down into the upper chamber. When the chamber is nearly full and the chimney begins to spit and spurt, your coffee is done.
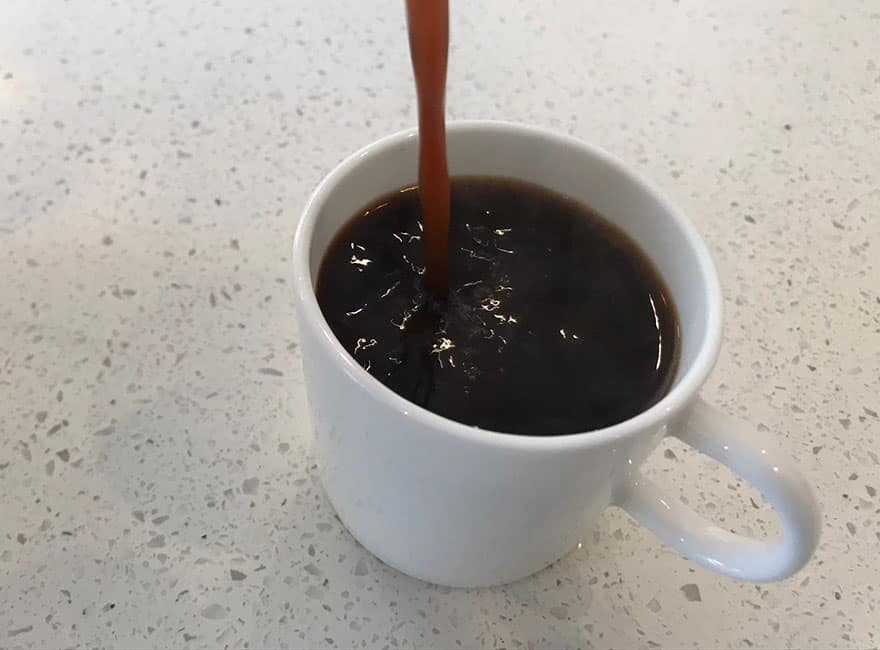
8. Remove, pour and enjoy
Remove the brewer from the burner. Some people like to set it on a cool damp towel to halt extraction quickly, but we’re not sure this is necessary. There is very little water remaining in the lower chamber, so extraction is pretty much finished. You certainly don’t need to worry about this step if you pour your coffee into a cup right away.
Troubleshooting Moka Pot Coffee
If you follow the instructions, brewing your coffee should go smoothly. When it comes to getting the perfect taste, however, this can be a bit tricky. A lot of different factors can affect the taste of your brew.
Metallic Taste
If your coffee tastes metallic, you may simply have overcleaned your pot.
That sounds odd, right? Why would cleanliness ruin your coffee’s taste? Well, when you overclean your moka pot, you actually remove the lingering coffee residue from previous brews, which is a little bit like seasoning a cast iron frying pan with olive oil. When your brewer heats your coffee without this residue, you’ll get a more metallic aftertaste.
Bitterness
What if your coffee is too bitter? This can be for a couple of reasons.
You may have over-extracted. And since the brewing time and temperature on a moka pot are quite consistent (the maximum volume of water is dictated by the size of your pot), then your only recourse is to change your grind size. Bitter flavors reside in the center of a coffee granule, and the smaller the grounds are, the easier those bitter flavors are to pull out. So try a slightly coarser grind next time and the bitter flavors might stay inside.
Bitterness can also arise because of your beans. Over-roasted or poor-quality coffee beans give off a naturally bitter taste. Stay on top of the freshness of your beans. When you brew stale beans, it’ll give your coffee a funky taste.
Weak Coffee
If your coffee is too weak, either your grind is too coarse or you just haven’t used enough grounds.
Strong Coffee
If your coffee is too strong, you can dilute it with hot water before drinking. Either that, or cut down slightly on the grounds next time.
Other Potential Problems
Aside from taste, you may experience some technical difficulties. For example, if steam is coming out of your lower part of your moka pot, you likely have a clog. Take apart the entire pot, rinse it, and wipe any leftover grounds from the filter. If this doesn’t solve your problem, you may need a new moka pot.
If you’re only getting trace amounts of coffee, you either have a filter blockage or you’re not sealing your pot correctly. Try unscrewing and rescrewing your pot. Make sure those threads are lined up and screw together snugly as you attach the chambers. If the problem persists, check your filter and remove anything that’s blocking proper flow.
If your moka pot is sputtering, see our post on how to fix a sputtering moka pot.
About the Moka Pot
Moka pots are stovetop coffee makers of Italian origin that brew with pressure. Alfonso Bialetti invented the moka pot in the 1930s. It has become a popular device around the world but particularly in its home country.
It’s not just a great brewer—it also has a unique design that’s fun to have around. There are plenty of great moka pots for you to choose from.

Moka pots are typically made of aluminum, but they also come in stainless steel. This makes them nearly indestructible, which is a big advantage if you’re comparing a moka pot to a French press, for example.
What Size Moka Pot Should You Buy?
The volume of coffee you want to make should determine the size of the moka pot you buy. Bialetti, the No. 1 brand in moka pots, makes them in eight different sizes ranging from one cup to 18 cups. However, Bialetti considers one cup to be equivalent to 40 mL (or 1.35 fluid ounces). They are talking about espresso cups. So if you want to brew a typical eight-ounce cup of coffee, you’re going to need a 6-cup moka pot.
Moka Pot Sizes
Here are Bialetti’s moka pot sizes, and how much coffee they will make in typical U.S. eight-ounce cups.
Bialetti Size Guide
| Moka pot size | Millilitres | Fluid ounces | Typical servings |
|---|---|---|---|
| 1 cup | 40 mL | 1.35 fl. oz. | one-sixth |
| 2 cup | 80 mL | 2.7 fl. oz. | one-third |
| 3 cup | 120 mL | 4 fl. oz. | half |
| 4 cup | 160 mL | 5.4 fl. oz. | two-thirds |
| 6 cup | 240 mL | 8 fl. oz. | 1 |
| 9 cup | 360 mL | 12 fl. oz. | 1.5 |
| 12 cup | 480 mL | 16 fl. oz. | 2 |
| 18 cup | 720 mL | 24 fl. oz. | 3 |
They aren’t big, but a moka pot is a lot like an AeroPress in that it’s best-suited for making just a cup or two.
Why Are Bialetti’s Sizes So Small?
Well, you’ll sometimes hear a moka pot described as a “stovetop espresso maker.” This is misleading, because espresso must be brewed at a minimum nine bars of pressure and moka pots can’t come close to this. However, it is possible to make dense, concentrated coffee in a moka pot by maximizing the amount of coffee grounds you use. Many Italians do this as an easy stovetop alternative to espresso, hence the tiny cup sizes.
In this post, I want to show you how to make standard cups of coffee rather than dense, espresso-like thimbles, so the size recommendations are based on that.
Does a Moka Pot Steam Milk?
You might be wondering, “Hey, if Italians use moka pots as an espresso substitute, does it also steam milk?”
A moka pot cannot steam milk. You’ll have to do that separately for your lattes and cappuccinos. However, I know of one very handy person who converted a moka pot into a milk frothing device. Check it out!
How to Properly Clean Your Moka Pot
Cleaning your moka pot the right way can save you from having to troubleshoot brewing mistakes. A lot of people struggle with their technique for cleaning a moka pot.
All you need is warm water and a washcloth. Although it seems counterintuitive to clean a coffee pot without soap, soap can negatively impact the taste of your coffee. As mentioned before, overcleaning a moka pot removes leftover flavor from the residue of past brews. So, even when your machine appears stained, fight your desire to scrub it. You’ll also want to avoid harsh abrasive scrubbers.
After your moka pot cools down, dump the grounds from the basket. Get rid of as many as possible. Separate all the pieces. Then, rinse off any leftover grounds using warm water. Use your fingers if necessary to get rid of remaining grounds. Once everything is thoroughly rinsed, take your dry washcloth and dry each piece of your moka pot. You can also air dry it.
Once it’s dry, you can either reuse it or put it away. Be sure it’s fully dry before reassembling. Water droplets leave mineral deposits that can eventually cause erosion of the metal.
Hot or Cold Water for a Moka Pot?
An earlier version of this post contained certain advice about preheating water for your moka pot that has become gospel in coffee circles, but a Bean Poet reader with some credibility changed my mind about certain things.
Jonathan Atkin is a maritime photographer from Little Italy in The Bronx. He was forced to learn how to make coffee properly when he worked aboard trans-Atlantic cargo ships as a youth. He had to serve it to the officers in their mess.
“Coffee, I soon learned, is as essential to a ship’s operation as fuel,” Jonathan wrote.
He remains a connoisseur to this day.
Jonathan took particular issue with the idea that you should use hot water rather than cold water for moka pot coffee; that is, that water for moka pot coffee should be boiled first then added to the brewer. On this, he had consulted with several Italian friends and their nonne (grandmothers).
“I was met with Italian words of derision that I cannot print,” Jonathan says. “My Italian friends said, ‘We have been making moka coffee since the 1930s without preheating.”
I have now tested it both ways. I taste no difference. Preboiling the water is simply an extra, unnecessary step that I can no longer recommend. Fill your moka pot with cold water and take it straight to the burner.
Can You Half Fill a Moka Pot?
For me, though, the bigger revelation was that you can half fill a moka pot and don’t need to fill the grounds to the rim. Everybody says to fill the grounds filter—even Bialetti. However, Jonathan pointed out that this makes it impossible to achieve a conventional coffee-to-water ratio.
Admittedly, for most of my life I have found moka pot coffee to be a little too harsh and heavy, even for my tastes which lean toward strong coffee. I could never seem to get it right.
After hearing from Jonathan I decided to ignore the standard advice of filling the basket to the rim and instead simply calculated my coffee-to-water ratio like I would for any pour-over or drip coffee.
This changed everything.
It produced a nice, bold cup of coffee with none of the heaviness that I always found a little off-putting. This is the way I will brew moka pot coffee from now on.
How Much Coffee to Put in a Moka Pot?
Simply put, unless you want it really strong, stick to a standard coffee-to-water ratio of about 1-to-16. On a 6-cup Bialetti moka pot that holds eight ounces of water to make a full cup of coffee, that’s about 14.5 grams of coffee. Don’t worry if it doesn’t fill the basket!
Reduce or increase the amount of coffee for different size moka pots. For example, on the 4-cup version use about 9.7 grams if you’re filling the water chamber all the way to the valve.
How Much Water to Put in a Moka Pot?
The amount of water you put in a moka pot depends on the size of your moka pot, but you should never fill it past the bottom of the pressure-release valve, which you can see on the inside of the lower chamber.
I would also not recommend trying to brew with the chamber less than half full. It will heat and brew too quickly and you may not have time to react.
But don’t be afraid to brew half as much coffee as your moka pot can handle. If you have the 12-cup (16-ounce) version and only want to brew 12 ounces, that’s OK. Fill your water two-thirds of the way to the valve and add enough coffee grounds for a 12-ounce coffee (about 21.5 grams). It will work just fine.
Moka Pot FAQ
Moka pots come with many questions, even if you know how to brew a standard cup. This section highlights common questions and provides moka pot tips so you can brew according to your personal preference.
How do I Make an Espresso With a Moka Pot?
Unfortunately, you cannot get espresso-strength coffee with a moka pot. You can, however, get a relatively concentrated espresso-like brew by filling your grounds basket to the rim. Level it off with the flat edge of a knife, but do not pack it in.
What Type of Coffee Should I Use for a Moka Pot?
The best coffee for moka pot that we’ve found is Illy Classico Ground Moka Coffee. Its rich aroma and smooth taste make it perfect for stovetop moka pot preparations. We list several other options, including some high-end specialty coffees, in our post about the best coffees for moka pot.
Ultimately, it’s up to you. It’s possible to brew everything from light to dark roast in your moka pot. If you’re sensitive to caffeine after a certain time, consider brewing decaf or a weaker roast to avoid adverse effects.
As a side note, moka pots are very popular for making authentic Cuban-style colada coffee.
Should I Buy Ground or Whole Bean Coffee?
If you have your own coffee grinder, it’s better to buy whole beans. Whole bean coffee stays fresher than ground coffee because you only grind what you need. If you can’t afford a grinder, ground coffee works fine, but buy in small quantities. If possible, get a specific moka pot grind to avoid clogs.
How Long Do Moka Pots Take to Brew?
The length of time it takes to brew your coffee depends on the size of your moka pot as well as your brewing temperature. Bigger moka pots require longer to heat the water, so consider that when choosing your size.
Brewing your coffee at a lower temperature usually tastes better, but takes much longer. A lower temperature can take up to 15 minutes to brew, where a higher temperature might only take five. Experiment to find your personal preference.
Moka pots are a classy, relatively easy way to get a great concentrated dose of caffeine. The bold coffee it produces mixes wonderfully with milk and cream. Whether you like it straight or in latte form, this is an affordable brewer worth trying.
Can You Make Iced Coffee With a Moka Pot?
You absolutely can! In fact, a moka pot is one of the best tools for making iced coffee. We provide full instructions for moka pot iced coffee in another post.