
Last Updated on November 5, 2023
Many situations call for a large amount of coffee—not just Monday morning.
If you’re hosting a morning business event or catering a big dinner party, your usual brewing method might not produce enough. When you need a lot of coffee at once, a large coffee percolator can be a great solution. But they can seem intimidating if you’ve never used one before.
This guide will teach you how to use a large coffee percolator, plus where to get one, how their parts function, and what kind of coffee you should use.
Coffee percolators have been around since the 1800s, but the way they work hasn’t changed much since then. These efficient machines range in size from relatively small (designed for personal or household use) to impressively large (designed for a crowd). Regardless of size, they all work in roughly the same way.
How a coffee percolator works
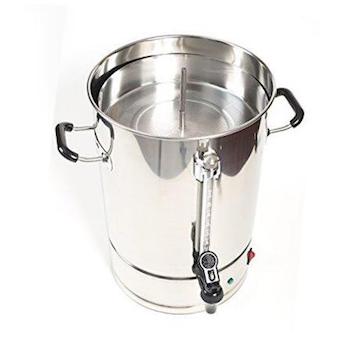
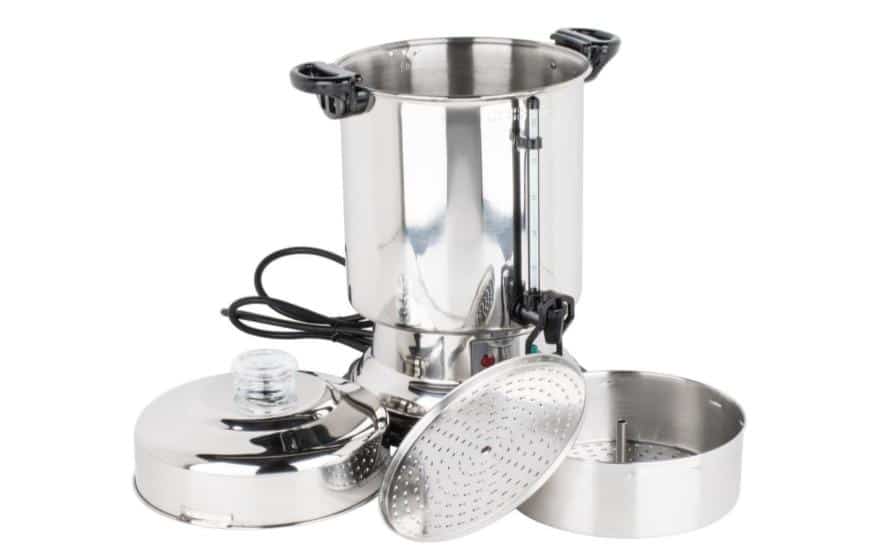
The main pot of the percolator provides space for the water that will become brewed coffee. The base of the brewer sits above a heat source. While some percolators go over an external heating source, like a stove, most large ones have an electric heating element built in. The perforated filter basket at the top holds your coffee grounds and a vertical tube carries water from the base of the pot to the top.
Brewing with a percolator
As the percolator’s heat source warms the water in the main chamber, the water at the bottom boils first. The bubbles formed in this process naturally move up the vertical tube in the center of the brewer. The water then drips out of the tube and into the coffee chamber at the top. It seeps through the grounds and eventually, the brewed coffee drips from the bottom of the chamber back into the main pot.
Where to get a large coffee percolator
If you’re planning to serve 30+ people, a large percolator can definitely help. But, where do you get one?
If you frequently serve large groups, you can buy a large percolator at a kitchen supply store. However, if your event is a one-off, then renting one is a more economic choice. To rent a large coffee percolator, check out the party rental centers in your area to find the best price.
Parts of a large coffee percolator
All coffee percolators consist of the same basic elements. No matter the size of the percolator, you’ll find the main pot, a small base that contains the heating element, a vertical tube, and a perforated filter basket at the top.
On some models, the filter basket will have a cover that helps distribute water evenly.
What kind of coffee should you use?
Choosing the right kind of coffee is important when using a coffee percolator. In general, choose medium roast beans and a coarse percolator grind size.
When you percolate, the coffee passes through the grounds over and over again, becoming stronger and more intense each time. It’s very different from drip coffee. Because of this, the subtle notes found in light-roast coffees generally won’t come through, and dark roasts risk ending up too bitter. Medium roast is great. (We explored some of the differences between dark roast and medium roast in an earlier post.)

As for the grind, coarse is necessary so your grounds won’t pass through the relatively large holes in the filter basket, although you’ll probably end up with at least a little bit of sediment regardless.
For the best taste, grind your own coffee beans as close to brewing time as possible.
Step-by-step instructions
The best instructions to follow are those that come with your percolator. However, if you’re renting a large coffee percolator, it’s possible that the manufacturer’s instructions will be missing.
If you don’t know where to start, the directions below will get you up and brewing in no time.
- Open the percolator and familiarize yourself with the parts.
- Fill the main pot with water. Most large percolators will have markings on the side to help you measure.
- Insert your coffee filter (optional). Most large percolators have built-in filters, but if you prefer a paper filter to minimize sediment, simply find one that matches the diameter of your filter basket.
- Add coffee grounds to the filter basket. Make sure that the grounds are evenly distributed and that you are using coarsely ground coffee.
- Replace the lid to the filter basket, if necessary.
- Replace the lid to the percolator, plug it in, and if necessary turn it on. Plan on 40-60 seconds of brewing time for each cup of brewed coffee.
Here’s a video showing you the process in action:
Simpler than you thought, right?
Measuring the grounds and brewing time
It’s best to plan on 1 1/2 cups of coffee per person for large events. When we say “cups,” we’re talking about standard cups of coffee which are 5 oz, rather than a measuring cup which is 8 oz.
The following information will help you decide how much coffee to use and how long brewing time will take:
| Cups of coffee | Volume of water | Volume of grounds | Brewing time |
|---|---|---|---|
| 30 | 20 1/2 to 21 cups | 2 to 2 1/2 cups | 25-30 minutes |
| 50 | 34 to 34 1/2 cups | 3 to 3 1/2 cups | 40-45 minutes |
| 75 | 51 1/2 to 52 cups | 4 1/2 to 5 cups | 60-65 minutes |
| 100 | 68 to 69 cups | 6 to 6 1/2 cups | 80-85 minutes |
How to clean a coffee percolator
Whether you’re renting a large percolator or buying one of your own, you’ll need to know how to clean it when your finished brewing coffee.
After your brewing is done, begin by unplugging the machine and allowing it to cool down.
Once cooled, remove the filter basket and the vertical stem. You may need to twist the pole in the center to “unlock” it from the base.
Dispose of the used coffee grounds and thoroughly rinse both the filter basket and stem with clean water. Use a sponge to gently wipe clean the percolator’s main pot.
Get started on your guest list!
Now that you know how to use a large coffee percolator, making coffee for a large group should be simple. Remember to choose a coarsely ground coffee and go with a medium roast for the best taste.
And make sure to plan ahead. Brewing a large quantity of coffee takes a lot of water, grounds, and time.