
Last Updated on December 15, 2023
We coffee connoisseurs are always looking for the next big thing, and cold foam is pretty—ahem—hot right now.
Microfoam has always been a nice way to top off a cappuccino or flat white. Fortunately, you can switch to cold foam and get the same smooth, creamy experience atop your iced coffee drinks. Even better, you don’t need a Ph.D. in chemistry to do it yourself. Yes, you could buy an expensive machine like the ones they have at Starbucks, but why spend the money if you don’t have to?
This article will dive deep into the world of cold foam—what it is and how you can make a tasty batch in your own kitchen. Buckle up because this is going to be a foamy ride.
What is cold foam?
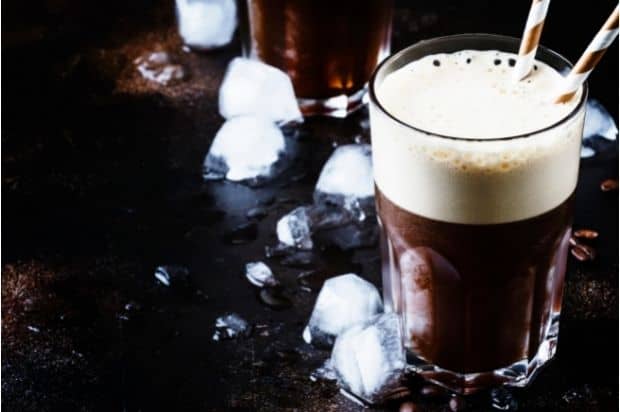
As the name suggests, cold foam is a form of milk foam that is cold instead of hot. Milk works well for producing foam because it contains proteins and fat. However, hot foam is best made with high-fat milk, such as two per cent or whole milk. Cold foam, though, works best with low or non-fat milk options.
The process for making both types of foam is similar, except with cold foam you don’t need to heat your liquid before frothing it. Cold foam is ideal for iced coffee or cold brew coffee since it won’t turn into a lukewarm mess.
Origins of cold foam
Technically, the first cold foam machines originated in Japan, as beer companies wanted to create a thicker, richer head for their patrons. Kirin was one of the first brands to use cold foam back in 2012.
For coffee, however, Starbucks began the trend in 2014 in Seattle. Then, the company spread cold foam to the rest of the country by 2018. The original blend was designed for the Americano con Crema beverage, but now you can get cold foam on any cold coffees from the store.
Because Starbucks is a massive corporation, it can afford to buy high-tech machinery to make its foam. These devices are like a fancy blender with a uniquely shaped blade that forms the foam quickly and evenly. Thankfully, you can get a similar effect without it.
How to make Starbucks-style cold foam at home
Once you’ve tasted an iced beverage with cold foam, you won’t want to go back to drinking it straight.

You can choose a few different methods, and you can try regular foam or flavored versions, depending on your tastes. Some preparation options are a bit trickier than others, so you’ll want to practice your technique to get it right every time.
What you’ll need
Realistically, all you need is one device, such as:
- French press
- Mason jar
- Blender
- Handheld electric milk frother
- Handheld mixer
We’ll go into more details about how to use each option later. Chances are that you have at least one of these items in your kitchen right now, so you don’t need to go to the store to buy anything (except maybe milk).
Best milk for cold foam
As we mentioned, non-fat milk is the best choice for cold foam, while high-fat milk is ideal for hot foam. If you’re not a fan of cow’s milk, you can choose an alternative version and froth almond, soy, or oat milk. As long as the fat content is low, it should work well for this process.
Five ways to make cold foam
The main trick to creating cold foam is to make the bubbles as small as possible. The reason smaller air bubbles are preferable is that they can hold their shape better and make the foam smoother and creamier. To achieve this effect, you’ll need to froth your milk for longer than you might expect.
In each of these cases, you’ll want to start with about half a cup of milk. If you prefer more foam, simply add more milk as desired. That said, don’t mix liquid milk with the foam, as that can disrupt the bubbles and lead to a flat, watery material. Instead, scoop out the existing foam and froth new milk.
Make cold foam with a French press
This device is designed to separate coffee grounds from liquid, so it has tiny holes for fluid to pass through. When using a French press for cold foam, just move the plunger up and down vigorously for a few minutes. Once you have your desired consistency, you can pop the top off and pour the foam onto your coffee. This takes some work, but it’s our favorite method for the best quality foam.
Make cold foam with a mason jar
This low-tech option works best with a mason jar since it has an airtight lid. All you have to do is pour the milk in, tighten the cap, and shake the liquid until it gets foamy. Depending on how much milk you use, this technique can be quite a workout, so plan accordingly. Overall, a jar is not ideal for daily use.
Make cold foam with a blender
If you’re short on time, a blender works well for cold foam. For best results, press the pulse button a few times. The faster the blades spin, the more bubbles you can create. Depending on your blender, you might be able to get smooth foam after a few seconds, but most blenders will take a little longer (about half a minute).
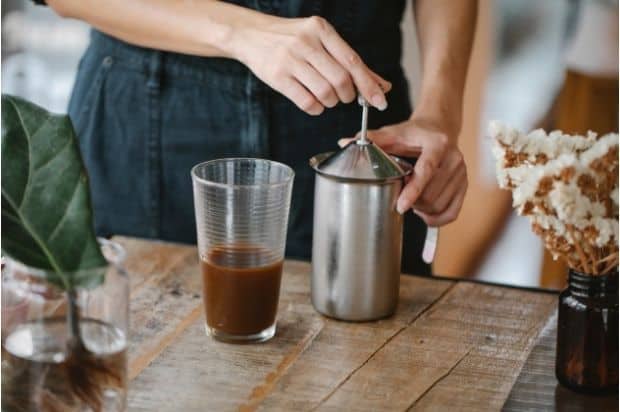
Make cold foam with a handheld milk frother

Serious coffee lovers may already have a milk frother in their kitchen. A handheld frother works wonders for hot foam, but you can get a similar effect with cold milk as well. You will need a mug or cup to stir the milk until it’s nice and thick. Keep in mind that the liquid will more than double in size, so use a large enough mug to hold it all.
Make cold foam with a handheld mixer
An immersion blender works similarly to a milk frother, but it will take longer to get the same results since its blades are bigger. Again, use a large mug to accommodate the amount of foam you’re trying to produce.
Making flavored cold foam
If you’re not a fan of nonfat milk, you can elevate your cold foam game with flavor options. All you have to do is add some flavored syrup to your milk before frothing. There is no “golden ratio” of milk to syrup, but you’ll need less than you might think. Start with just a drizzle and add more if necessary. You can also taste the foam as you go to determine if it’s too sweet or not sweet enough.
Common flavor options use peppermint, mint, chocolate, and vanilla extract. Feel free to mix and match different syrups to get a better-tasting foam.
Enjoy!